Laser Pointer Cleaning Guide: Expert Maintenance to Fix Dim, Blurry & Speckled Beams (2026)
Complete troubleshooting and maintenance guide for handheld laser pointers. Learn how to safely clean your lens, diagnose beam problems beyond dirt, choose the right tools and solvents for glass vs plastic lenses, and maintain your pointer's battery, contacts, and duty cycle for years of use.
Image Gallery
This laser pointer cleaning guide starts with a counterintuitive truth. If your beam has turned into a big green circle full of dots instead of a clean point, or if it dims after a second of use, the answer is not always cleaning.
Blind cleaning with the wrong materials is exactly how most users permanently damage their lenses.
You know the frustration. You pull out your green laser for stargazing or a presentation, and the dot looks scattered, ugly, or barely visible. The internet gives you a dozen conflicting answers: use alcohol, don't use alcohol, try Q-tips, Q-tips ruined my lens, blow on it, use a glasses cloth, never use glasses cloth. It's paralyzing. This guide ends that confusion.
You'll learn how to diagnose what's actually wrong with your beam, the safe cleaning procedure that pro optics labs use, adapted for handheld pointers, exactly which materials will destroy a plastic lens in seconds, and the maintenance habits that keep your pointer working through cold nights and long storage. For a deeper understanding of laser output ratings and what your pointer's power label actually means, see our laser pointer power levels guide.
Key Takeaways
- Nine times out of ten, a "dirty" beam pattern is not dirt at all, it's a focus issue, thermal degradation, battery corrosion, or DPSS crystal temperature sensitivity
- Acetone dissolves acrylic laser lenses in seconds; isopropyl alcohol can permanently haze plastic lenses; toilet paper and Q-tips drag abrasive grit across optical surfaces
- Coherent's industrial laser maintenance protocol, blow first, dry clean second, wet clean only as a last resort, works just as well for a $20 handheld pointer
- 532nm DPSS green lasers fail in cold weather not because they're dirty, but because DPSS crystals only operate reliably between -5°C and +50°C; 520nm direct-diode lasers handle -20°C to +60°C
Do You Need a Laser Pointer Cleaning Guide? A Symptom Checklist First
The biggest mistake in laser pointer maintenance is assuming every beam problem means a dirty lens. On forums like Laser Pointer Forums and Reddit's r/LaserPointers, users repeatedly discover this the hard way. One LPF user spent an hour cleaning a 301 model only to find his "ugly scatter" was a focus misadjustment, not dirt. Another user's 532nm pointer dimmed after two seconds, he assumed dirty optics, but the community diagnosed fried pump diode crystals from continuous overuse.
The FDA classifies laser pointers as Class IIIa devices limited to 5mW visible output for pointing purposes. Boston University's laser safety manual notes that 532nm green lasers can appear 10 to 50 times brighter than red lasers at identical power levels, which is why green pointer owners notice beam quality issues far more quickly than red pointer owners.
Before reaching for any cleaning tool, run through these questions:
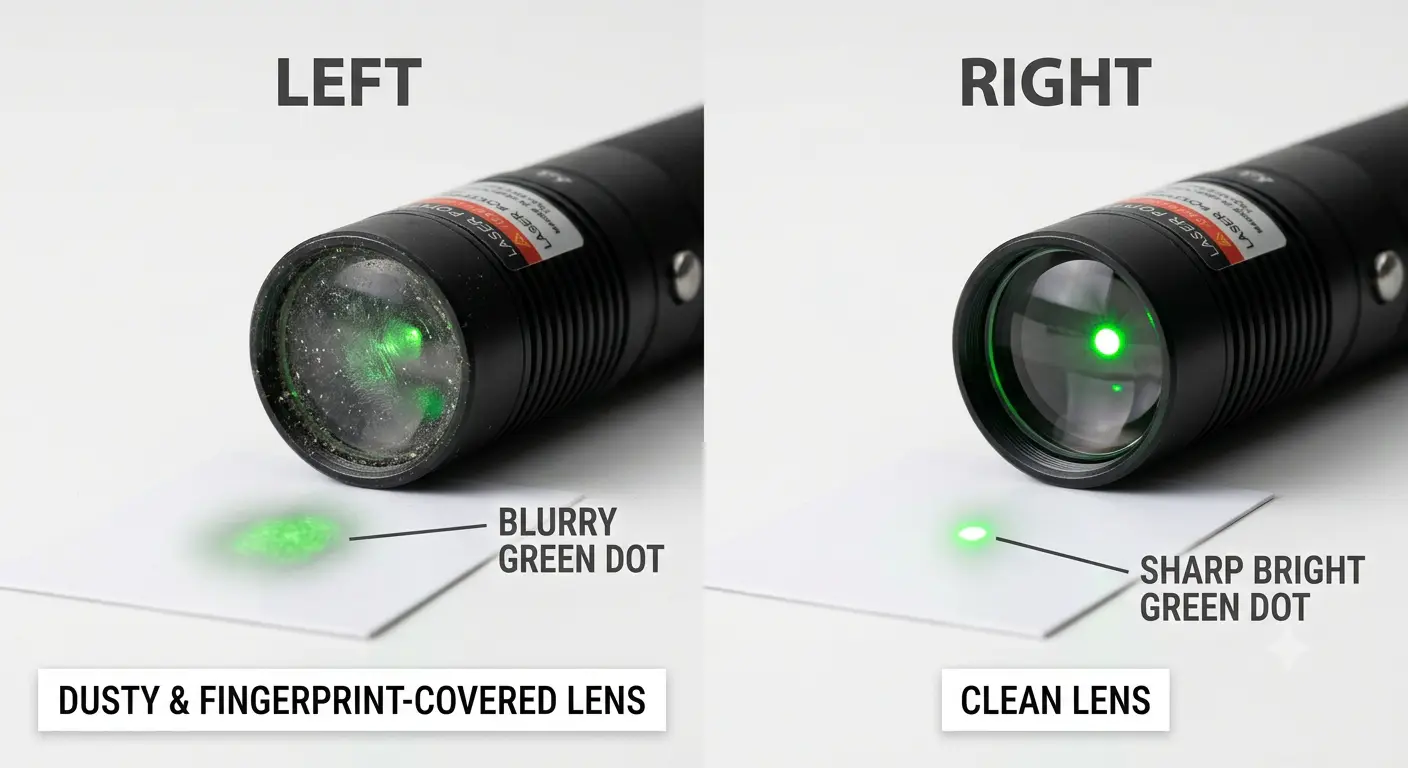
Is the beam a big circle with dots scattered around it? Reddit user on r/LaserPointers described their problem exactly: "The lens are dirty cause it makes a big green circle with tons of dots every time i turn it on." This pattern most often points to a smeared or genuinely dirty lens, but occasionally it indicates a scratched lens or a focus ring that has drifted.
Does the beam look blurred with a slightly brighter point in the center? A Reddit user on r/lasers cleaned their 303 with "alcohol 96 and toilet paper" and got exactly this result: "now it looks very blurred and a slightly brighter point in the center." This pattern almost always means cleaning residue or chemical damage to the lens surface, you may need to re-clean properly, or the coating may already be compromised.
Does the laser dim after one or two seconds of being on? A Laser Pointer Forums user reported: "Laser dims after a second (or two). When I try more times, it dims faster." This is almost never a lens issue. Fresh batteries, especially in 532nm DPSS pointers, can briefly push a damaged pump diode before it thermal-throttles. The fix is not cleaning, it's understanding whether the pointer is recoverable or thermally degraded beyond repair.
Does the pointer not work in cold weather, then work fine indoors? This is a telltale DPSS temperature behavior, not a cleaning issue. 532nm DPSS green lasers have a narrow operating temperature window of roughly -5°C to +50°C. Below that, crystal efficiency collapses and output drops to near zero. Bring the pointer back to room temperature and it recovers.
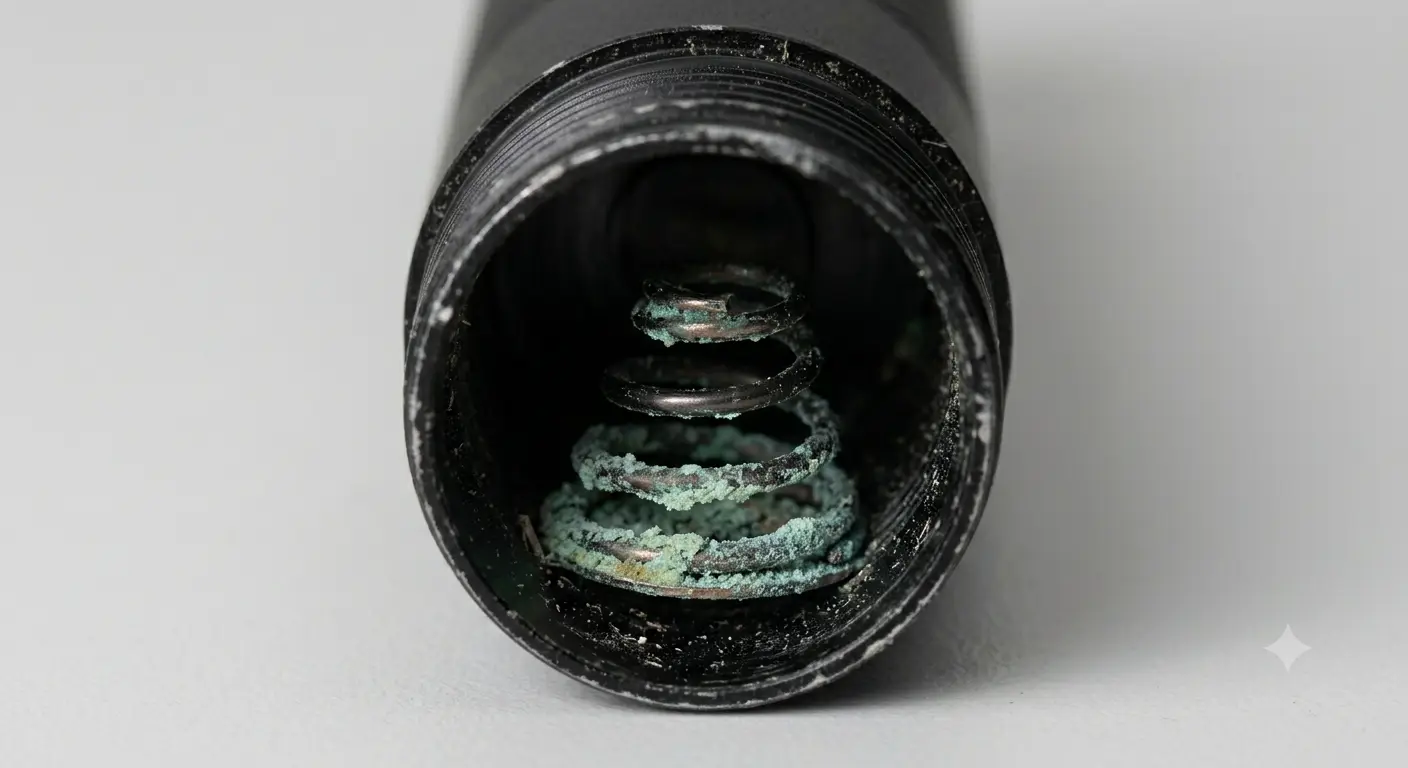
Does the pointer not turn on at all after months in storage? A Reddit user on r/telescopes found their 5mW Lumicon green pointer dead after storage. Inspection revealed "corrosion on the spring contact." Battery leakage during storage is one of the most common but least-discussed pointer killers. Cleaning the lens won't help a pointer whose power circuit has been eaten by alkaline residue.
Does the dot look fine at close range but scatter after about 5 feet? A Laser Pointer Forums user noted their pointer's "dot becomes scattered after 5 feet or so and not so tight, quite ugly in fact." Cheap 301 and 303 models often ship with poorly seated focus assemblies or low-grade plastic lenses. No amount of cleaning fixes a fundamentally misaligned lens housing.
If your symptom matches dirt, visible dust specks on the lens, smudge marks from fingerprints, a general haze that clearly sits on the outer surface, proceed to the cleaning sections. If your symptom matches any of the other patterns above, skip directly to the relevant diagnostic section. Cleaning won't fix a dead battery contact or a thermally degraded crystal.
The table below maps common symptoms to their most likely causes and first action:
Glass vs Plastic Lens: Know Your Laser Pointer Before You Touch It
Before picking up any cleaning tool or solvent, you must determine whether your pointer's lens is glass or plastic. This single piece of information determines whether acetone will clean your lens or melt it into a useless blob.
In 2024, a Laser Pointer Forums user learned this lesson the hard way. After applying acetone to a dirty 303 laser lens, the reply came back: "Yup, the acetone melted that good."
303 and 301 model pointers, among the most common budget green lasers on the market, frequently use acrylic or polycarbonate lenses. Acetone is a known solvent for both materials. The lens was destroyed in seconds.
A separate Reddit user on r/lasers warned: "cleaning a plastic lens with IPA (isopropanol alcohol) will damage it beyond repair." While IPA is safe for coated glass optics, certain plastic formulations can haze or craze on contact with alcohol. The takeaway is not that IPA is dangerous, it's that you must know what you're cleaning before you clean it.
So how do you tell if your lens is glass or plastic without solvents?
The most reliable method is the tap test. Remove the pointer's laser module or access the bare lens surface. Gently tap it with a non-metallic tool, a wooden toothpick works well.
Glass produces a distinct high-pitched ringing or ping sound. Plastic produces a dull tick or thud. This alone distinguishes the two materials in seconds.
Visual inspection provides secondary clues. Glass lenses on budget pointers typically look green-tinted from anti-reflective coating when viewed at an angle. Plastic lenses often appear completely clear or slightly blue-white without any coating tint. Under magnification, glass shows sharper edge chamfers and sometimes coating speckle; plastic edges often look slightly rolled or molded.
A final price proxy: if your laser pointer cost under $20 at retail, assume it has a plastic lens. If it cost over $50 and comes with documented specifications (wavelength, output power, class rating, beam divergence), it is more likely to have a coated glass lens. Between $20 and $50 is the ambiguous zone, always test, never assume.
Once you have identified your lens material, lock in your cleaning approach: glass lenses can handle spectroscopic-grade isopropyl alcohol or pure acetone on optical-grade lens paper. Plastic lenses require a completely different approach, dry cleaning only unless absolutely necessary, using only distilled water on a fresh microfiber if dry cleaning fails.
The Laser Pointer Cleaning Guide (Step-by-Step)
The cleaning protocol that industrial laser manufacturers like Coherent use for multi-thousand-dollar optical assemblies follows a simple hierarchy: blow first, dry clean second, wet clean only as a last resort. The Coherent laser module maintenance manual specifies that wet cleaning should only be attempted when dry cleaning is insufficient. The same logic applies to your $20 handheld pointer, but the consequences of skipping steps are proportionally worse because replacement parts are harder to source.
Step 1: Blow Off Loose Particles
Laser Components, a major optics manufacturer, is explicit about this: always remove loose particles with compressed air or a manual blower before any contact cleaning. Dragging a Q-tip or cloth across a lens covered in microscopic dust is functionally identical to dragging sandpaper across glass. The dust particles, often silica from airborne dirt, are harder than most lens coatings and will leave micro-scratches you cannot see but that scatter your beam permanently.
The Laser Components optics cleaning guide also warns that eyeglass cloths often harbor anti-fog chemicals that eat optical coatings.
Use a dedicated lens blower, not your mouth. Human breath contains moisture droplets and possible saliva particles. Compressed air cans work but must be held upright to avoid propellant residue. A manual squeeze-blower for camera lenses costs a few dollars and works perfectly.
For a complete overview of laser pointer safety practices including eye protection, see our laser pointer safety guide.
Step 2: Dry Clean With Optical-Grade Material
If visible particles remain after blowing, move to dry contact cleaning. The Coherent laser diode module manual specifies optical-grade lens paper exclusively. For handheld pointers at the consumer level, a clean, fresh, high-quality microfiber cloth, one never used for eyeglasses, phones, or household cleaning, is the practical equivalent.
Fold the cloth so that a clean, untouched section contacts the lens. Use a single, light pass in one direction. Do not rub. Do not use circular motions. The goal is to lift particles away, not to redistribute them across the surface.
Step 3: Wet Clean (Only If Steps 1-2 Didn't Work)
The Coherent manual specifies that wet cleaning should only be attempted when dry cleaning is insufficient. For wet cleaning, Coherent recommends spectroscopic-grade isopropanol or methanol applied to optical-grade lens paper, used in a gentle figure-8 motion, never scrubbing, never circular rubbing.
For consumer handheld laser pointers, adapt this protocol:
For glass lenses: Apply one drop of 99% isopropyl alcohol (not drugstore 70% rubbing alcohol, the 30% water content leaves residue) to a fresh microfiber corner. Wait five seconds for the alcohol to begin dissolving any organic film. Then a single light figure-8 pass. Use a dry corner of the cloth to immediately absorb excess before it dries and leaves residue.
For plastic lenses: Distilled water only, one tiny drop on a fresh microfiber, same figure-8 motion, same immediate dry-absorption step. Do not use alcohol, acetone, or any solvent on a plastic lens unless the manufacturer's documentation explicitly permits it. Most don't.
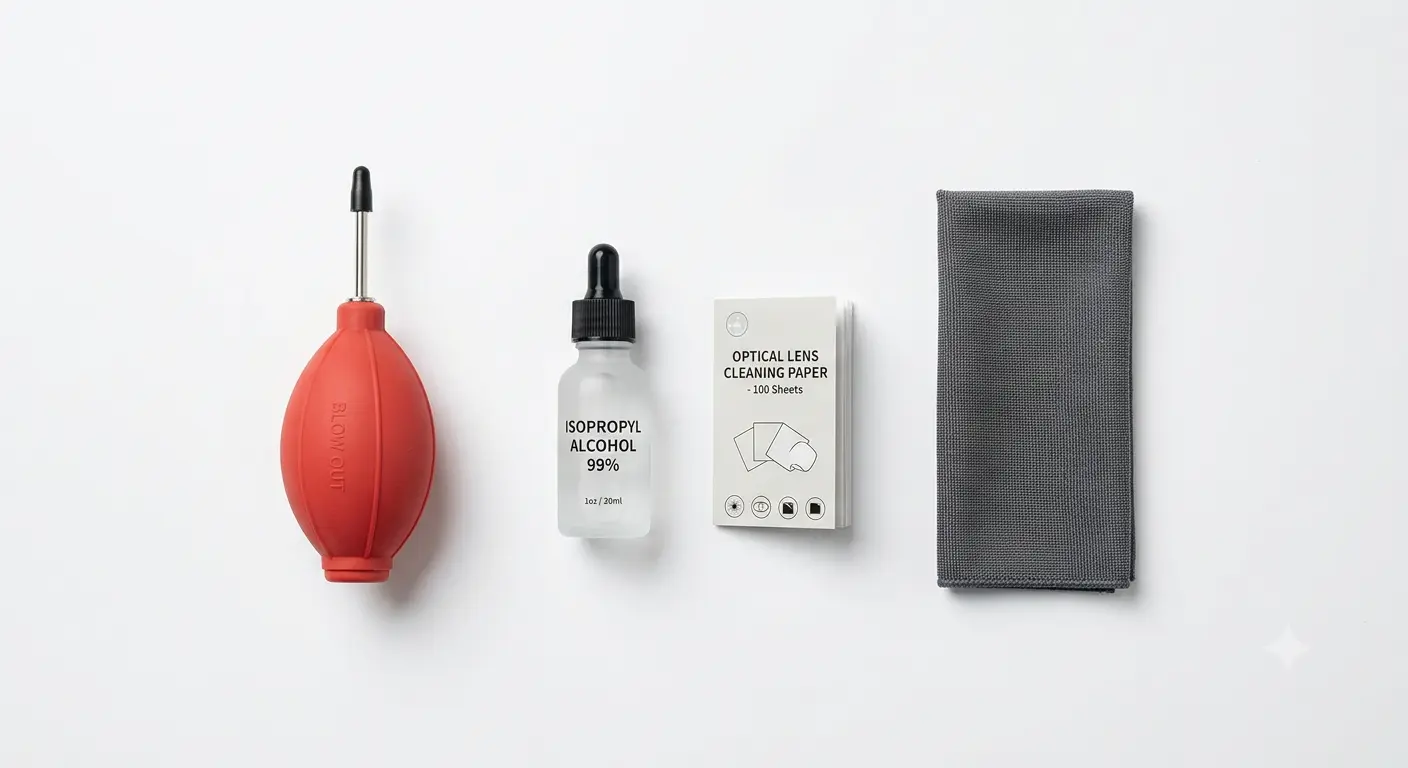
Tools That Actually Work
The professional cleaning kit for a handheld laser pointer is simpler than you think: a manual squeeze blower, two or three clean high-quality microfiber cloths dedicated only to this purpose, a bottle of 99% isopropyl alcohol (for glass lenses only), and optical-grade lens paper if you want the industrial standard.
Cotton swabs or Q-tips are not on this list. Their loose fibers snag on lens edges, they trap and drag particles, and they apply uneven pressure. The Laser Pointer Forums user who "wasted a G-9 lens" with Q-tips learned this the expensive way.
What NEVER to Use on a Laser Pointer Lens
Some of the most common household cleaning instincts will damage your pointer faster than leaving it dirty. Here is what the real user accident reports tell us, not theory, but verified destruction.
Toilet paper, kitchen roll, and facial tissue. A Reddit user on r/lasers used "alcohol 96 and toilet paper" to clean a 303 lens and got a "very blurred" beam with "a slightly brighter point in the center."
Paper products designed for skin are not designed for optics. They shed fibers, contain lotions and binding agents, and are abrasive enough at the microscopic level to scratch coatings. They also absorb solvents and redistribute them unevenly, leaving residue streaks.
Acetone on plastic or acrylic lenses. As documented on Laser Pointer Forums, "Yup, the acetone melted that good", acetone chemically dissolves acrylic and many polycarbonate formulations. It reacts in seconds. There is no recovery from this. If you have a glass lens and pure acetone, it can be appropriate for stubborn organic films, but never let it touch plastic.
Isopropyl alcohol on plastic lenses. Multiple warnings from Reddit's r/lasers community describe IPA causing haze or crazing on plastic lenses. While PLA-coated or glass lenses can generally handle high-purity IPA, the cheap acrylic or polycarbonate lenses found in budget pointers may not. If you cannot confirm your lens is glass, do not use alcohol.
Cotton swabs and Q-tips. A Laser Pointer Forums user reported explicitly: "I tried q-tips, that wasted me a G-9 lens." The cotton fibers catch on the lens rim and edges, dragging swarf and particles in circles. The thin stick applies uneven cleaning pressure. Even premium-brand cotton swabs are not made for optical surfaces.
Eyeglass cleaning cloths. Laser Components specifically warns that standard eyeglass cloths may contain anti-fog substances or cleaning agents that attack optical coatings. Your reading glasses are polycarbonate with a scratch-resistant dip.
Your laser pointer lens, if glass, has a thin-film anti-reflective coating with completely different chemical sensitivity. The cloth you use on your glasses may already be loaded with skin oils, household dust, and whatever cleaning spray you last applied.
Glasses cleaning sprays. Never spray Windex, eyeglass cleaner, or any household glass cleaner onto a laser pointer lens. These products contain ammonia, surfactants, and fragrances that leave residue films on optical surfaces. The same chemicals that make your windows streak-free will leave a microscopic film on your pointer's lens that scatters laser light.
Toothpaste and other abrasive myths. A 2026 Reddit user on r/lasers reported trying "the toothpaste saga" on a scratched lens: "Didn't work." Their follow-up: "Am I cooked?" They were.
Toothpaste is a mild abrasive designed for enamel, not optical glass. It removes material, which is the opposite of what a scratched lens needs, you cannot polish out a scratch on a thin-film coated optic without destroying the entire coating layer.
Metal tools on coated optics. Laser Components puts this in all caps for a reason: "Never Clean Metal Coatings." Some laser pointer output windows have thin metallic coatings as part of their optical stack. Any cleaning solvent or abrasive contact on these surfaces will strip the metal layer instantly. If your lens has a gold, copper, or silver-colored reflective coating visible, you are looking at a metal-coated optic, do not touch it with any cleaning method.
When Cleaning Goes Wrong: Common Damage Patterns and How to Fix Them
Sometimes cleaning makes things worse. You followed a guide, or you didn't, and now the beam pattern is different, but not better. Here is what happened and what your options are.
Blurred beam with a bright center point after cleaning. This is how the "alcohol 96 and toilet paper" case presented on Reddit. The likely cause is residue transfer: paper fibers, skin oils from handling the cleaning material, or mineral residue from impure alcohol drying on the lens surface. Re-clean using the proper protocol above, blow, then fresh microfiber with nothing applied, then (for glass only) a single controlled drop of 99% IPA on a clean cloth section and immediate dry absorption. Many "blurred after cleaning" cases resolve on the second proper attempt.
Hazed or milky lens surface that does not wipe clear. If the lens surface has developed a permanent haze that no amount of proper cleaning removes, the anti-reflective coating has likely been chemically etched. This happens when solvent makes prolonged contact with a thin-film coating or when the wrong cleaner dissolves the coating binder. A hazed coating scatters light, reducing beam brightness and creating halos. The lens element needs replacement, the coating cannot be restored by cleaning.
Micro-scratches visible only when the laser is on. If you see fine lines or diffraction patterns around your beam that weren't there before cleaning, you have scratched the lens or, more likely, the anti-reflective coating. Scratch repair on optical glass is a precision grinding process done with cerium oxide and a pitch lap, not something any user should attempt on a 5mm diameter laser pointer lens. Reddit user's "toothpaste saga" attempt on a scratched lens confirmed this: "Didn't work." A scratched lens needs replacement, not polishing.
Focus ring now produces different beam patterns than before. Some pointers, particularly 301 and 303 models, use a threaded focus ring secured with weak glue. If your cleaning involved disassembly or twisting pressure, you may have shifted the focus ring's thread position.
A Laser Pointer Forums user in the 301 cleaning thread discovered this: their "scattered dot" problem was "focus problem apparently", the lens seat had moved during handling. Try slowly threading the focus ring through its full range while observing the beam at a fixed distance. You may find a different thread position restores the original beam quality.
When to Stop: Replace the Lens or the Whole Pointer
There is a point where continuing to clean or repair becomes irrational. Here is the decision framework that most laser pointer cleaning guides never provide.
Replace the lens if: the glass is intact and uncoated, the housing is accessible without destructive disassembly, and replacement lenses are available. Many 301/303-type pointers use standard-thread modules that accept aftermarket glass lenses for a few dollars. For pointers with cemented or press-fit lens assemblies, lens replacement is usually not practical.
Replace the whole pointer if: the lens is plastic and damaged, the anti-reflective coating is etched or scratched, corrosion has eaten through battery contacts, the pointer shows thermal degradation (dimming after seconds even with fresh batteries), or the pointer cost less than $30 new. A $15 budget pointer with a chemically melted lens and corroded spring contacts is not a restoration project, it is e-waste.
Stop cleaning if: you have followed the full protocol twice (blow → dry clean → wet clean with correct material for your lens type) and the beam has not improved, or if the beam has gotten worse. At this point, the issue is not surface dirt; it is subsurface damage, internal optical misalignment, or a non-optical electronic problem.
The Reddit user who asked "Am I cooked?" after the toothpaste failure on a scratched lens was given the same advice by multiple commenters: replace the lens or replace the pointer. Not every cleaning story ends with a restored beam. Knowing when to stop is part of being a responsible owner.
If your pointer is beyond repair, browse our collection of high-power laser pointers for professional-grade replacements, or start with a budget-friendly Laser 303 green pointer if you are replacing a damaged entry-level model.
Beyond the Lens: Full Pointer Maintenance
The lens is the most visible part of your pointer's optical path, but it is not the only thing that fails. These maintenance practices prevent problems that users consistently misdiagnose as "needs cleaning."
Remove Batteries Before Long-Term Storage
The Reddit user on r/telescopes who found their 5mW Lumicon pointer dead after storage with visible contact corrosion is not an isolated case. Alkaline batteries leak. The residue, potassium hydroxide, is corrosive to metal contacts and will creep up spring terminals, destroying the electrical connection.
For any storage period longer than a month, remove all batteries. For pointers with built-in lithium batteries, store at approximately 50% charge, fully charged lithium cells stored long-term degrade faster, and deep-discharged cells may not recover.
Inspect and Clean Battery Contacts
If your pointer won't turn on after storage and the batteries are fresh, inspect both the positive and negative contacts. A green-white crust on the spring or flat contact means alkaline corrosion.
For light corrosion, a cotton swab dampened with white vinegar (acetic acid neutralizes alkaline residue) followed by a dry swab can restore contact. For heavy corrosion that has removed plating or eaten into the metal, the contact needs replacement, and for a budget pointer, this usually means the whole pointer.
Respect the Duty Cycle
Duty cycle is the ratio of on-time to off-time that keeps a laser diode's junction temperature within safe limits. BigLasers, a manufacturer of high-power green pointers, specifies a 100-second on / 30-second off duty cycle for their 100mW 532nm Razer model. Cheaper pointers rarely document their duty cycle, but the physics is the same regardless of whether it is printed on the box.
The Laser Pointer Forums user whose 532nm pointer dimmed "after a second or two" had reportedly run it continuously for approximately 10 minutes. Community diagnosis: "fried the pump diode or crystals inside."
Many budget 532nm DPSS green pointers overdrive their pump diodes beyond thermal specification. The compact brass host bodies common on these models provide inadequate heat sinking. When you exceed the unstated duty cycle, the junction temperature rises until the diode permanently degrades. The symptom, rapid dimming after power-on, looks like a "dirty lens" but is permanent thermal damage.
A conservative rule for any pointer without a published duty cycle: 60 seconds on, 60 seconds off. If the host body feels warm to the touch, extend the off-time.
For guidance on selecting a durable replacement pointer with proper duty cycle documentation, see our best laser pointer under $100 recommendations.
Thermal damage from ignored duty cycles is permanent and progressive. For a comparison of laser power levels, safety implications, and duty cycle guidelines by power tier, see our laser power levels explained article.
Avoid Over-Tightening Threads
The tail cap, battery tube, and focus ring on most pointers use fine aluminum-on-aluminum threads with thin anodizing. Over-tightening strips the threads, creates metal particles that can migrate onto the lens or into the driver cavity, and can crack the thin walls of budget pointer bodies.
Finger-tight is enough. You are making an electrical contact, not torquing a bolt.
Store in a Dry, Room-Temperature Environment
Humidity accelerates contact corrosion and can promote fungal growth on lens surfaces in long-term storage. A silica gel packet in your pointer's storage case costs nothing and prevents months of invisible damage. Avoid attics, garages, and car glove compartments, temperature swings from -10°C to +40°C in a parked car stress solder joints, degrade lithium cells, and cause differential expansion between the brass module and aluminum host, potentially misaligning optics.
532nm vs 520nm: Why Your Green Laser Acts Different in Cold Weather
One of the most confusing maintenance scenarios for green laser owners is seasonal. In summer, the pointer works perfectly. In winter, stepping outside yields a dim flicker or nothing at all. Back indoors, after warming up, the beam returns to full brightness.
Users naturally reach for a lens cloth, but the lens is not the problem.
The explanation lies in the fundamental difference between the two types of green lasers on the market.
532nm DPSS (Diode-Pumped Solid State) lasers generate green light through a two-stage process: an 808nm infrared pump diode fires into a neodymium-doped crystal, which lases at 1064nm, and a frequency-doubling crystal converts that to 532nm green. This crystal stack is temperature-sensitive.
According to Laser Components' technical comparison, 532nm DPSS lasers typically operate within a narrow band of approximately -5°C to +50°C. Below freezing, crystal efficiency drops sharply. Output power collapses. The laser appears "dead" or "dirty" to the user, but the optics are fine, the crystals simply cannot function at that temperature.
520nm direct-diode lasers generate green light in a single step: a semiconductor diode emits at 520nm directly. There is no crystal stack, no frequency doubling, no temperature-sensitive intermediate conversion. Laser Components reports that 520nm direct-diode lasers operate reliably from -20°C to +60°C, a temperature window more than twice as wide. They also demonstrate better power stability during warm-up and superior thermal modulation capability.
For the laser pointer owner, this means:
If you primarily use your pointer outdoors year-round, astronomy, search and rescue, cold-weather hiking, a 520nm direct-diode model eliminates the seasonal "my laser doesn't work" problem entirely. If you already own a 532nm DPSS pointer and use it in cold weather, the fix is not cleaning. Let the pointer warm up in an inside pocket for five minutes before use, and limit continuous on-time in cold conditions.
For a cold-weather-ready 520nm direct-diode pointer built for year-round outdoor use, see the Elite 520nm Green Laser. For a compact, pocket-sized 520nm option, the Compact Green Laser 1.5W 520nm operates reliably from -20°C to +60°C.
For beam visibility science including how distance and environment affect your laser dot, read our laser pointer distance and visibility guide. Curious how far a laser beam can really travel? See can a laser pointer reach the moon. To browse the full catalog of replacement and upgrade options, visit the laser pointer product center.
Frequently Asked Questions
Can I use alcohol to clean my laser pointer lens?
Only if the lens is confirmed glass and you use 99% isopropyl alcohol, not 70% rubbing alcohol, which contains 30% water and leaves mineral residue. For plastic lenses, alcohol risks permanent hazing or crazing. Always confirm the lens material before choosing a solvent.
How often should I clean my laser pointer lens?
Only when you can see visible contamination affecting the beam. Laser pointers are not camera lenses, the output window is recessed and protected from incidental contact. Most pointers go months or years between needed cleanings. Prophylactic cleaning creates more problems than it solves.
Can a dirty lens make a laser pointer look dim?
Yes. A film of skin oil, dust accumulation, or condensed moisture on the output lens scatters a portion of the beam before it leaves the pointer. This reduces both brightness and beam quality. But dimming that comes and goes with temperature, or that develops progressively over seconds of use, points to thermal or electrical issues, not a dirty lens.
Are cheap laser pointer lenses glass or plastic?
Assume plastic unless proven otherwise. Sub-$20 pointers almost universally use acrylic or polycarbonate lenses. Between $20 and $50, the material varies by manufacturer. Over $50 with proper documentation, glass becomes more likely. Always test before applying any cleaning method.
For a detailed breakdown of laser diode types and the optical components inside different pointer price tiers, see our laser power and technology guide. For stargazers and outdoor users, our best laser pointer for astronomy covers weather-proof models.
Budget pointers with plastic lenses are not worth restoring when chemically damaged, the replacement lens often costs more than a new unit. According to the FAA's lithium battery safety guidelines, proper battery handling and storage is also essential for any portable electronic device, including laser pointers.
Why does my laser pointer not work in cold weather?
If you have a 532nm DPSS green laser, this is expected behavior. The DPSS crystal stack loses efficiency below approximately -5°C. Your pointer is not broken and its lens is not dirty, it is simply outside its operating temperature range.
Warm it up indoors or against your body and it will recover fully. If you need cold-weather reliability, a 520nm direct-diode green laser operates down to -20°C.
Should I remove batteries when storing my laser pointer?
Yes, for any storage period longer than a month. Alkaline batteries leak potassium hydroxide, which corrodes contacts and can destroy the pointer's electrical path. For pointers with built-in rechargeable lithium batteries, store at approximately 50% charge.
Full or empty storage accelerates battery degradation. The TSA's battery transportation guidelines provide additional context on safe lithium battery handling applicable to laser pointer storage.
Why is my laser pointer making a big circle instead of a dot?
This is the most common user complaint and has multiple possible causes. A smeared or dirty lens produces a diffuse circle with bright spots. A scratched lens produces a circle with visible diffraction artifacts.
A misaligned focus ring, common on 301 and 303 models, also produces a circle, especially at longer distances. If cleaning with the proper protocol does not improve the pattern, the issue is likely focus alignment or physical lens damage.
What is the average lifespan of a laser pointer?
With proper maintenance and duty cycle respect, a quality laser pointer using a glass lens and a properly heatsinked diode can last thousands of hours, BigLasers rates their 532nm Razer at over 5,000 hours expected lifetime. Budget pointers with plastic lenses, resistor-limited drivers, and minimal heat sinking typically degrade within hundreds of hours or less, depending on usage patterns.
Why does my laser get weaker the longer I use it?
Overheating. Every laser diode experiences a reduction in output efficiency as junction temperature rises. If the host body cannot dissipate heat fast enough, output power drops continuously during a session.
This is a thermal management issue, not a cleaning issue. Reduce your continuous on-time and extend your off-time between uses.
How do I fix a scratched laser pointer lens?
You don't. DIY scratch repair methods like toothpaste, baking soda paste, or metal polish are abrasive compounds that remove material from the lens surface. This is exactly the wrong approach for a precision optical element with a thin-film anti-reflective coating.
A scratched lens needs replacement. If the pointer is a budget model, replacing the entire pointer costs less than sourcing a compatible replacement lens element.